
As AI-powered applications like chatbots and virtual assistants become increasingly integrated into our daily lives, ensuring that they interact with users in a safe, respectful, and responsible manner is more important than ever.
Unchecked user input or AI-generated content can lead to the spread of harmful language, including hate speech, sexually explicit content, or content promoting violence or self-harm. This can negatively affect the user experience and may also lead to legal or ethical problems.
Microsoft’s Azure Content Safety service provides a powerful toolset for automatically classifying and evaluating text (and image) content for various harm categories. By using it, developers can build safer, more reliable AI-driven applications without implementing complex moderation logic from scratch.
In this tutorial, we’ll walk through how to integrate Azure Content Safety into a Spring Boot application using Spring AI and filter user messages in real time. The app will check incoming messages against Azure’s classification engine, and only forward them to an OpenAI model (via Spring AI) if they meet safety thresholds.
Azure Content Safety Deployment
Before integrating Azure Content Safety into the application, you need to deploy the service to your Azure subscription. For this tutorial, we’ll use Terraform to automate the setup.
The provided Terraform template will create the following:
- A resource group
- An Azure Content Safety instance (with free F0 tier by default)
Prerequisites
To run the Terraform deployment, make sure you have the following tools installed:
You will also need to authenticate Terraform to Azure. One recommended way is to use a service principal. You can create one with the following command:
az ad sp create-for-rbac --name "terraform-sp" --role="Contributor" --scopes="/subscriptions/" --output json > terraform-sp.json Then export the required environment variables:
export ARM_CLIENT_ID="appId from terraform-sp.json"
export ARM_CLIENT_SECRET="password from terraform-sp.json"
export ARM_TENANT_ID="tenant from terraform-sp.json"
export ARM_SUBSCRIPTION_ID=$(az account show --query id -o tsv)
Deploying With Terraform
The deployment is defined in a set of Terraform configuration files.
The Terraform template (main.tf) looks like this:
terraform {
  required_providers {
    azurerm = {
      source  = "hashicorp/azurerm"
      version = ">=4.1.0"
    }
  }
}

provider "azurerm" {
  features {}
}

resource "azurerm_resource_group" "rg" {
  name     = var.resource_group_name
  location = var.location
}

resource "azurerm_cognitive_account" "content_safety" {
  name                = var.cognitive_account_name
  location            = azurerm_resource_group.rg.location
  resource_group_name = azurerm_resource_group.rg.name
  kind                = "ContentSafety"
  sku_name            = var.sku_name

  identity {
    type = "SystemAssigned"
  }

  tags = {
    environment = "dev"
  }
}

output "content_safety_endpoint" {
  value = azurerm_cognitive_account.content_safety.endpoint
}

output "content_safety_primary_key" {
  value     = azurerm_cognitive_account.content_safety.primary_access_key
  sensitive = true
}

resource "local_file" "content_safety_output" {
  filename = "${path.module}/outputs.json"
  content  = jsonencode({
    endpoint = azurerm_cognitive_account.content_safety.endpoint
    key      = azurerm_cognitive_account.content_safety.primary_access_key
  })
  file_permission = "0600"
}
The variables.tf file looks like this:
variable "resource_group_name" {
  description = "The name of the resource group"
  type        = string
  default     = "rg-content-safety"
}

variable "location" {
  description = "Azure region"
  type        = string
  default     = "westeurope"
}

variable "cognitive_account_name" {
  description = "Globally unique name for the Cognitive Services account"
  type        = string
  default     = "contentsafetydemo123" # must be globally unique
}

variable "sku_name" {
  description = "SKU name for the account (e.g., F0 for Free Tier)"
  type        = string
  default     = "F0"
}
And here is an example terraform.tfvars for deploying to the free tier:
resource_group_name    = "rg-my-content-safety"
location               = "westeurope"
cognitive_account_name = "contentsafetyexample456"
sku_name               = "F0"
After defining these files, you can initialize and apply the deployment as follows:
terraform init
terraform apply
At the end of the process, Terraform will output the Azure Content Safety endpoint and key. These values will also be saved to a local outputs.json file, which will be used later during the application configuration.
Dependencies
Since spring-ai is still only available as a milestone release, you need to add the Spring Milestone repository to your Maven configuration. You can do this by including the following snippet in your pom.xml:
        central
        Central
        https://repo1.maven.org/maven2/


        spring-milestones
        Spring Milestones
        https://repo.spring.io/milestone

            false
You also need to include the spring-ai-bom in your dependency management section:
            org.springframework.ai
            spring-ai-bom
            1.0.0-M6
            pom
            import
After that, you can add the following dependencies:
- spring-boot-starter-web – for building the REST API
- spring-ai-openai-spring-boot-starter – for integrating with OpenAI via Spring AI
- azure-ai-contentsafety – the official Azure Content Safety client library for Java
Here’s how to include them in your pom.xml:
        org.springframework.boot
        spring-boot-starter-web


        org.springframework.ai
        spring-ai-openai-spring-boot-starter


        com.azure
        azure-ai-contentsafety
        1.0.11
Setting Up the Chat Client
To get an OpenAI ChatClient working, the first step is to provide the required API key. This can be done using the following property:
spring:
  ai:
    openai:
      api-key: ${OPENAI_API_KEY}
The ChatClient itself, which serves as the interface to communicate with the underlying chat model, can be configured like this:
@Bean("mainChatClient")
ChatClient mainChatClient(ChatClient.Builder clientBuilder, List advisors) {
    return clientBuilder
            .defaultAdvisors(advisors)
            .build();
}
Note: By default, the ChatClient will use the gpt-4o-mini model, but this can be overridden using the spring.ai.openai.chat.options.model property.
If you wire the ChatClient into a RestController like this, you can start interacting with the chat model through the /chat/send endpoint:
@RequestMapping("/chat")
@RestController
public class ChatController {
    private final ChatClient chatClient;

    public ChatController(@Qualifier("mainChatClient") ChatClient chatClient) {
        this.chatClient = chatClient;
    }

    public record UserMessage(String message) {
    }

    public record AiMessage(String message) {
    }

    @PostMapping(value = "/send")
    public ResponseEntity sendMessage(@RequestBody UserMessage userMessage) {
        return ResponseEntity.ok(new AiMessage(chatClient.prompt(userMessage.message()).call().content()));
    }

}
As shown in the ChatClient configuration above, you can register so-called advisors to a given client. But what are these advisors?
Advisors in Spring AI are components that participate in a chain, allowing you to customize how chat requests are built and how responses are handled. Each advisor in the chain can add logic before the request is sent to the model or after the response is returned. They are useful for injecting system instructions, adding safety checks, or modifying the prompt dynamically without putting this logic directly into the main application code.
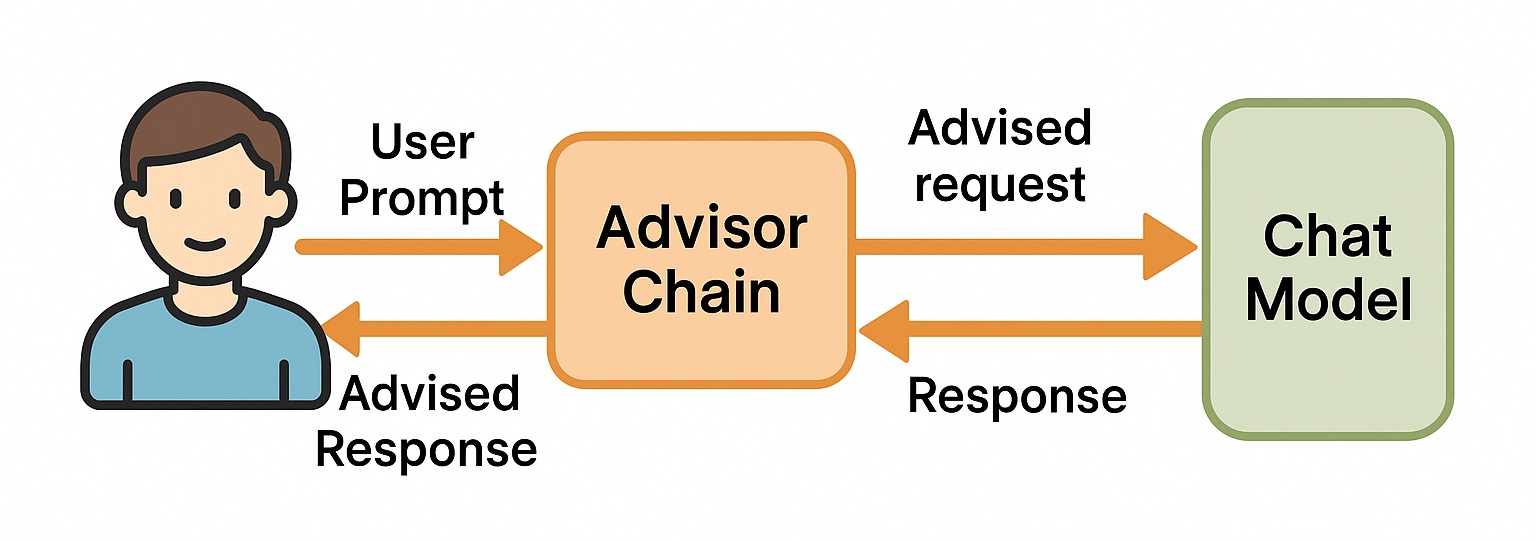
So we have the ability to create our own Advisor implementation that can check each user prompt using the Azure Content Safety service, based on its harm categories, before the prompt reaches the ChatModel.
Harm Categories
Azure Content Safety can analyze a user message and classify it into one or more predefined harm categories. These categories represent different types of potentially dangerous or inappropriate content. The classification is multi-label, meaning a single message can be associated with multiple categories at once.
There are four built-in harm categories:
- Hate – Targets or discriminates against individuals or groups based on attributes such as race, ethnicity, nationality, gender identity, sexual orientation, religion, immigration status, ability status, personal appearance, or body size.
- Sexual – Covers content related to sexual acts, anatomy, romantic or erotic expressions, sexual assault, pornography, or abuse.
- Violence – Describes or encourages physical harm, injury, or the use of weapons, including violent threats or references to violent acts.
- Self-harm – Includes language about hurting oneself or suicide.
Each harm category comes with a severity level rating. These levels indicate how serious the content is and help you decide what kind of action to take. The severity score ranges from 0 to 7. By default, Azure groups these values into four simplified levels:
- Scores between 0 and 1 → level 0
- Scores between 2 and 3 → level 2
- Scores between 4 and 5 → level 4
- Scores between 6 and 7 → level 6
However, if you need more fine-grained detail, you can configure the API request to return the original 0–7 scale instead of the simplified version.
To configure the Azure Content Safety client and enable harm category–based filtering, I defined the following properties in the application:
contentsafety:
  azure-content-safety:
    enabled: true
    endpoint: ${AZURE_CONTENT_SAFETY_ENDPOINT:}
    key: ${AZURE_CONTENT_SAFETY_KEY:}
    category-thresholds:
      -"Hate": 1
      -"SelfHarm": 1
      -"Sexual": 1
      -"Violence": 1
In the above configuration:
- enabled: Controls whether the Azure Content Safety check is active.
- endpoint: URL of the deployed Azure Content Safety resource. This value can be found in the outputs.json file generated by the Terraform deployment.
- key: Access key for authenticating requests. This is also available in the outputs.json file.
- category-thresholds: Defines the severity level threshold for each harm category. If the severity of any category in a user message exceeds the configured threshold, the message will be rejected.
Instead of simply returning a static response like “Rejected message!” when a prompt violates one or more harm category thresholds, the ContentSafetyAdvisor used in this application provides a short explanation.
This explanation is generated using a separate ChatClient, which receives the original user message along with the harm category results returned by Azure Content Safety. This secondary client is configured with system instructions that help it generate a polite and informative response. Here’s how the rejectExplanationChatClient is set up:
    @Bean("rejectExplanationChatClient")
    ChatClient rejectExplanationChatClient(ChatClient.Builder clientBuilder) {
        return clientBuilder
                .defaultSystem("""
                        You are a helpful assistant who can give a polite message rejection explanation.
                        All the user messages are checked for content safety by a dedicated service.
                        If the message is rejected, you should explain why the message is rejected.
                        You will get the original message and the results of the content safety service
                        where the content safety result will show the severity of the message in different categories.
                        The severity values are on a scale from 0 to 7, where 0 is the least severe and 7 is the most severe.
                        """)
                .build();
    }
The ContentSafetyAdvisor, which is responsible for checking incoming user messages and returning a rejection message if the harm category thresholds are exceeded, looks like this:
public class ContentSafetyAdvisor implements CallAroundAdvisor {
    private static final Logger LOGGER = LoggerFactory.getLogger(ContentSafetyAdvisor.class);
    private static final PromptTemplate REJECTION_PROMPT_TEMPLATE = new PromptTemplate("""
            Explain politely why the message is rejected.
            The rejected message is: {message}
            The content safety result is: {contentSafetyResult}
            """);
    private final ChatClient rejectExplanationChatClient;
    private final ContentSafetyClient contentSafetyClient;
    private final Map categoryThresholds;
    private final ObjectMapper objectMapper;
    private final int order;

    public ContentSafetyAdvisor(ContentSafetyClient contentSafetyClient,
                                ChatClient rejectExplanationChatClient,
                                Map categoryThresholds,
                                ObjectMapper objectMapper,
                                int order) {
        this.contentSafetyClient = contentSafetyClient;
        this.rejectExplanationChatClient = rejectExplanationChatClient;
        this.categoryThresholds = categoryThresholds;
        this.objectMapper = objectMapper;
        this.order = order;
    }

    @Override
    public AdvisedResponse aroundCall(AdvisedRequest advisedRequest, CallAroundAdvisorChain chain) {

        try {
            var analyzeTextResult = analyzeText(advisedRequest.userText());
            if (!isMessageSafe(analyzeTextResult)) {
                var rejectExplanation = provideRejectExplanation(advisedRequest.userText(), analyzeTextResult);
                return createResponse(rejectExplanation, advisedRequest.adviseContext());
            }
        } catch (Exception e) {
            return createResponse("I'm sorry, I can't answer you now.", advisedRequest.adviseContext());
        }

        return chain.nextAroundCall(advisedRequest);
    }

    @Override
    public String getName() {
        return "ContentSafetyAdvisor";
    }

    @Override
    public int getOrder() {
        return this.order;
    }

    private AnalyzeTextResult analyzeText(String text) throws Exception {
        var request = new AnalyzeTextOptions(text);
//        request.setOutputType(AnalyzeTextOutputType.EIGHT_SEVERITY_LEVELS); Severity levels from 0 to 7
//        request.setOutputType(AnalyzeTextOutputType.FOUR_SEVERITY_LEVELS); Severity levels in {0, 2, 4, 6} (the default).
        var result = contentSafetyClient.analyzeText(request);
        LOGGER.info("AnalyzeTextResult of message '{}': {}", text, objectMapper.writeValueAsString(result));
        return result;
    }

    private boolean isMessageSafe(AnalyzeTextResult analyzeTextResult) {
        for (var categoryAnalysis : analyzeTextResult.getCategoriesAnalysis()) {
            if (categoryAnalysis.getSeverity() > categoryThresholds.getOrDefault(categoryAnalysis.getCategory().getValue(), Integer.MAX_VALUE)) {
                return false;
            }
        }
        return true;
    }

    private String provideRejectExplanation(String message, AnalyzeTextResult analyzeTextResult) throws JsonProcessingException {
        return rejectExplanationChatClient.prompt(REJECTION_PROMPT_TEMPLATE
                        .create(Map.of(
                                "message", message,
                                "contentSafetyResult", objectMapper.writeValueAsString(analyzeTextResult))))
                .call().content();
    }

    private AdvisedResponse createResponse(String responseMessage, Map adviseContext) {
        return new AdvisedResponse(ChatResponse.builder()
                .generations(List.of(new Generation(new AssistantMessage(responseMessage))))
                .build(), adviseContext);
    }
}
Message Filtering
As shown in the configuration above, I set the default category-threshold for each harm category to a low value of 1. This allows me to demonstrate both an accepted and a rejected message without needing to include anything truly offensive. Below are two simple examples:
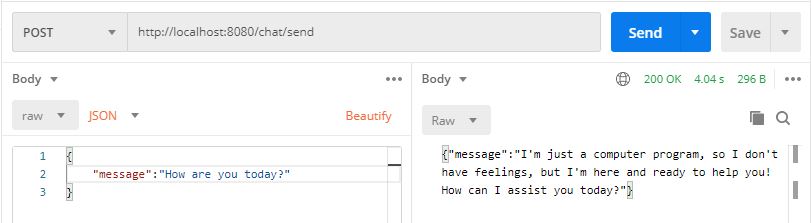
An accepted message
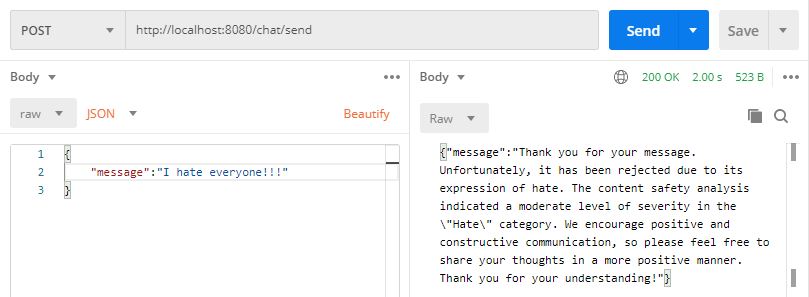
A rejected message
Conclusion
I hope this short article on integrating Azure Content Safety was helpful for you. The full source code is available here on GitHub. While this tutorial focused on the built-in harm categories provided by Azure, it’s also possible to train and use custom categories. But maybe that’s a topic for another time.